Friday, February 26, 2016

A New Portrait

For the last several months, along with other paintings, I've been working on a new portrait. This one is primarily from life, although I'm also using photographs. Photos are useful to me for the nuances that make up a good likeness while life sittings help with personality, posture, and a lot of intangibles that also go into likeness. This particular work has taken a long time because it began as a "life-only" portrait, which I thought would proceed with regular sittings, perhaps weekly for a while. In real life, of course, things happen. In the end we weren't able to do regular sittings, there was a several months hiatus, and in the end I succumbed and took a number of reference photos to use as the portrait nears completion.

Portrait of Jule
In general, I begin portraits on a toned support, often 12x16 but occasionally larger or smaller, depending on whether the image is to be head only, head and shoulders, or half length. For most portraits, I tone with an umber, aiming for about value 5. For the imprimatura on this one I used raw umber mixed with ultramarine and thinned with turpentine. Another interesting color is turkey umber, a natural earth that gives a somewhat greenish tint. And for some purposes, raw umber alone is sufficient.

For me, a portrait must begin with life sittings. Even if I only manage a session or two, seeing the subject in the studio, in natural light, is most important. Although I've tried to do portraits from photos without having seen the subject, they're inevitably difficult and the results generally disappointing. Life sittings give me an opportunity to get to know my subject. Even if it's already someone I know pretty well, I find that sitting for a portrait provides opportunities to observe the sitter closely, both from the standpoint of conversation and physical appearance. I also shoot numerous digital photos that I can view on my tablet as I go. These are most useful with corrections to likeness, although today's tablets and laptops can provide very good color reproduction.

I begin the portrait with an ebauche, again commonly with an umber, to sketch out the main portions of the image. Most often, I wait until the support is dry and ready to accept paint but occasionally I've been impatient and worked into the wet imprimatura. Either way, this initial lay-in is intended as a kind of map of the features, an attempt to accurately suggest volume, and a value map as well. Some artists do a charcoal sketch or even a thoroughly detailed drawing over their imprimatura, but most of the time I simply draw with a filbert brush and relatively liquid paint.

Once an initial drawing--more or less detailed--is down, I decide how to proceed. Sometimes this initial paint-drawing in raw umber can be used as the basis for a grisaille.  In traditional painting, a grisaille, basically a monochrome gray underpainting, serves as a guide for the full-color finished work. Colors are laid over the relatively finished grisaille, matching values as you go, and variably kept as full-bodied and thick paint or removed, more or less, leaving various intensities of color behind and revealing more or less grey. That was the technique of many "old masters"--underpainting and then glazing. An important trick at that point is to remember to step all values in the grisaille up about one level to compensate for layering, which dims values. So skin, usually about value 7, would be painted at value 8 because of the dulling of value with overlying layers of paint results in a closer match to the actual value. In the end, when done with care and attention to values, this sort of technique gives lovely, glowing color. Many 18th and early 19th century portraits were painted using this method.

Another way to go about a portrait is to paint directly, matching the colors and values you see in the skin and hair of the sitter. This technique has the advantage of placing the sitter in the same location and time over a long enough period to give me real understanding of their features, bone structure, skin colors and color temperatures, and the like. Again, photos are indispensable as backups, of course. Care has to be taken to understand light in the photos and attention to how any photograph distorts features is also important. Photos (depending on lens properties, etc.) too often "blow out" lights and darks. Many gifted painters used a direct method like this one. From Hals and Velazquez to Sargent and Whister, the direct method provides a real sense of life and immediacy.

This portrait has been done directly in most passages, but also I've glazed layers of colors in a lot of places. The underlying layers were mostly cooler and my overlying layers warmer. This is the state of the painting as of February 20, 2016. I expect to have the sitter in at least once or twice more but it's very nearly finished as is. I need to adjust the colors of the complexion, and there needs to be some detail work on the eyes and finish work on the garments and any jewelry, etc. Julie is a graphic designer and patient model. 


Friday, February 19, 2016

Brushes Part 3 - Care and Maintenance

Part 3 of a series of posts dealing with brushes for oil painting.

After spending a substantial sum on a good brush, the skinflint in me demands that it last as long as possible. Given the potential damage that solvents, oils, paint, soaps and even water can do to brushes, learning to clean and store them correctly is critical. There are differences in effective care among the various kinds of artist brushes, mostly based on the type of fiber. Originally I learned to use natural hair brushes, so the first section below deals with those. In the following section caring for the synthetic brushes (which I use most commonly now) will be covered.

There are other ways to care for brushes which may have merit; these are the methods I use. These techniques have stood the test of several decades of brush care. Anyone who can improve upon them, please let me know what you do.

Care of Natural Hair Brushes
Natural hair brushes come in two general types: hog bristle and various softer hairs such as red sable, true sable, badger, and others, even squirrel. Both types of natural hair should be treated similarly, although a few important differences do exist.

First, a word about using one's brushes. Proper use of brushes can extend their life substantially. Here are a few important principles:
  • In general, load only the tip of the brush, dipping into the paint no higher than about halfway to the ferrule. This helps to keep paint away from the ferrule; dried paint will ruin a brush by destroying elasticity and causing the hairs to become brittle and break.
  • Try to use separate brushes for separate colors and again, load each sparingly. It will mean more brushes to wash but they will be easier to clean and can last longer.
  • Don't use too much solvent. Some people paint a stroke or two then rinse the brush thoroughly in mineral spirits. In my experience this can be harmful by needlessly exposing brushes to chemical injury. Instead, I wipe paint from the brush between strokes and rinse infrequently since I use one brush for one color. 
  • Never let paint dry in your brushes.
  • Wash brushes immediately after each painting session. If you can't wash them with soap then at least wipe and rinse them to remove most of the paint. Don't delay washing longer than overnight.
  • Consider using linseed oil soaps and hair conditioner on natural hair brushes to maintain their resilience.  
Bad brush care can make yours look like the ones in this
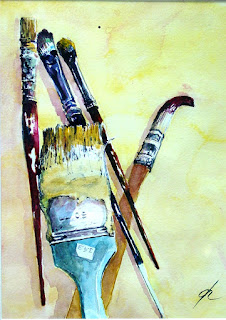
"Old Friends," watercolor, 2002. (Private collection)
watercolor I painted a few years ago. These were from a photo reference, in case anyone wonders--they certainly don't reflect how I treat my own brushes.


Hog bristles
These brushes should be wiped clean of paint at the end of the day's painting session, in particular squeezing the belly of the brush to force paint out of that area and out the tip of the brush. I generally use paper towels, but reusable cloth rags are more environmentally sound. Once the paint is out of the brush, rinse gently in mineral spirits as needed, squeezing out remaining dissolved paint. (The variety of mineral spirits doesn't really matter, though the odorless kind are more pleasant to use. A close friend of mine still advocates the use of kerosene, which is a kind of mineral spirit as well. Kerosene is the old friend of the sign painters of days gone by.) Brushes should be rinsed and wiped until you don't see any color come off onto the rag. You don't have to get every last particle of color out of the brush since you're going to wash it in soap and water anyway, but try to get as much out as possible. Be sparing with solvents. While natural hair will stand up to solvents pretty well, overusing them can cause damage. After rinsing, I wash this kind of brush in lukewarm water, using a good brand of cake soap, preferably. Hot water should be avoided since it will supposedly take the snap out of hog bristle, making them limp and less useful with thick paint. I don't wash bristles in hot water so I can't vouch for the accuracy of the warning. On the other hand, washing them in cool water seems to work fine. Ivory is my soap of choice, but many use special brush soap made with linseed oil. (Soap is compounded from a fat or oil plus an alkali like sodium hydroxide. Soap made with linseed oil will supposedly penetrate and clean oil paint from brushes more easily and thoroughly.) Whatever soap you use, work up a lather, wiping after each repetition then re-lather and wipe again. Wash for at least 30 seconds while working the soap/paint lather out of the brush. When no more color comes out, rinse with cold water and reshape bristles as necessary to their original shape. Saliva helps--lick your fingers. Flat and brights shapes have a slightly turned-in corners; filberts have elliptical, flat tips, and rounds are...round but come to a point. Many painters today also add a conditioner during the shaping step, similar to what people do after washing their own hair. Conditioners restore a bit of softness and springiness. Store brushes tips up in a cylindrical container--vase, coffee can, whatever--and allow to dry.

Soft Natural Hair
Like bristle brushes, this kind should be wiped of any residual paint, squeezing it from the belly as well. These brushes can stand up to mineral spirits, even kerosene, but in the case of more delicate or expensive brushes, I use gum spirits of turpentine, which seems gentler and is a good solvent. Turpentine can be used sparingly with good results. My technique is to make certain I've wiped out as much paint as I can, then dip the brush in turpentine, work a bit into the fibers, wipe again, repeating until nearly clean. In my experience, turpentine is more gentle than mineral spirits. Regardless, all brushes must also be washed, and again many use a linseed oil-based soap--there are a number on the market--plus a conditioner sometimes as they reshape the hairs. Washing is done similarly to bristles, working up a lather for 30 seconds, wiping, repeating until no color returns in the lather. Warmer water can be used than with bristle brushes but there's no real point in doing so unless you need a measure of softening to get paint out of the hairs. These brushes are best stored standing up until dry.


People sometimes wonder why a brush would dry better standing up, and honestly it beats me. Maybe they would dry as well lying flat. Many have said that capillary action helps in drying, which may be so, but capillary action works regardless of position. Capillary action occurs when a fluid flows from one end of a small-diameter tube to the opposite owing to the surface tension of the liquid and the adhesion forces against the tube. Position has no role. Capillary action is strong enough to raise liquid in paintbrushes against the pull of gravity, thereby keeping the ferrule more dry, but since this action can occur regardless of position, perhaps storing brushes tip-down, so that gravity aided capillary action, might keep the ferrules even more dry.)

Care of Synthetic Fiber Brushes
Most synthetic brushes these days seem to be made from nylon but there are a number of polymers out there and a number of proprietary names that are used. This is what I currently do with my synthetics. My current brand is Silver Ruby Satin but I also recently began to use some brushes made with Golden Taklon. I can't vouch for the effectiveness of this care routine for any other brushes except these.

At the end of the painting session, wiping and removing thick paint should always be first. Then a rinse or two in mineral spirits. Some painters seem to use a lot of mineral spirits during painting and I suspect that causes significant wear and tear on many synthetics. If you paint with a lot of such thinner, maybe these kinds of brushes aren't for you. A friend of mine, using the same kind of brushes as I do but with considerably more OMS rinsing has found that they splay and become unusable in a relatively brief period. Using considerably less OMS seems to preserve my own synthetics. In any event, I next wash the brush in plain soap and hot water, which does little to synthetic fibers of the two types above. These generally resume their shape quite well and dry very quickly standing up. Obviously no need for conditioner!

Salvaging brushes:
Sometimes a painter forgets a brush or two, maybe even leaves them without cleaning so that they've become hardened with paint. Good brushes are expensive. What to do?  Like so many things, it just depends. If the brush is hard as a board, the paint stiff and dry, throw it away. On the other hand, if the paint is dry to touch but flexible and clearly not dry through and through, you may be able to get the paint out and salvage it. Here are a few ideas and tips.
  • If the brush with the semi-dry or dry paint is a natural fiber type, first try soaking in mineral spirits for a few minutes. This may soften the paint and allow you to wipe at least a portion away. Synthetics may also benefit, but beware overusing mineral spirits with synthetics.
  • If cleaning a natural fiber brush, work a linseed oil soap into the belly of the brush if you can, then coat the entire outside with the soap and allow to stand for several minutes to several hours. This may soften the paint and allow you to wash it away. (In most cases, linseed oil soap is soft enough to allow this.) Generally I use Ivory to clean synthetics.
  • If you've been able to remove a substantial amount of paint by soaking but areas of dry paint still adhere to the fibers, try using linseed oil soap (for natural fibers) or Ivory (for synthetics) while scrubbing along the length of the fibers with a fingernail brush. These can be gotten from drugstores or cosmetics companies and have short, stiff bristles that can get between the fibers and scrub off flecks of dry paint. If this step fails, the brush probably can't be gotten more clean.
  • You can sometimes reshape skewed or splayed synthetic fibers by dipping them in boiling water and then reshaping. Natural hair can be reshaped while wet and then splinted using stiff cardboard (bristles) or a sizing agent (softer hair), although I don't use either trick.
Finally, even if you can't get out all of the paint, or the brush is splayed or bent or whatever, you might still keep it around for use in blending and in scrubbing layers. For that kind of activity, these sorts of derelict brushes can be ideal, and so you can get a bit more mileage out of them. 

For a good guide to brushes and their care plus considerably more and for substantially more expertise than mine, my favorite book is "Brushes" by Jacques Turner, published in 1992 and widely available online.

Brushes Part 1
Brushes Part 2 

Sunday, February 14, 2016

Windowsill Works

Some years ago, Duane Keiser started a blog called A Painting a Day and began posting (and selling) small oil paintings that he usually finished in a relatively brief painting session. Keiser's example spurred quite a number of other artists to paint and post a daily piece, so that the "painting a day" movement was born.

The practice and discipline of trying to do one painting every morning, generally in less than 30 to 60 minutes, appealed to me too, as a way to work every day and potentially study new ideas and to stay fresh. My studio faces northwest and morning light is indirect and soft, so I was able to simply lay a small gessoed panel (3x5, 4x6, or 6x8 mostly) alongside my mixing palette and paint an object resting on the windowsill before me. Furthermore, depending on whatever caught my interest, I could study color, value, composition, and so on. So it was a way to learn more about all sorts of other issues as well as a way to discipline myself. Over the course of a couple of years I painted perhaps 200 of these small paintings, generally one a day although sometimes more. Alas, after the usual burst of enthusiasm though, the daily paintings that I began calling Windowsill Works dwindled in quantity and probably in quality. Inevitably I suppose, after a year or so daily paintings gave way to daily drawings although I do still produce small finished pieces.

Here are a few Windowsill Works from that couple of years. It's pretty easy to see that in most of these the color selection was limited. Further, most were done in under 60 minutes--often under 30--which paradoxically meant spending considerable time looking and less time painting. To an observer it would likely look odd to see me standing motionless for minutes at a time, but to me looking very very carefully means mastering form and color and all sorts of other considerations about the object before ever touching brush to paint. The other discipline I tried hard to follow when doing Windowsill Works was the single touch--premier coup--method mentioned in another post. The idea was to set up  big shapes, making vigorous brushwork providing good information, using careful draftsmanship. As is always the case, some hit the mark and some fell very wide of it.

The first of what became the Windowsill Works series is the plastic water bottle in the painting below. It is quite small and took only about half an hour. The remainder are all 6x8 on gessoed hardboard. The objects in several are laying on a drawing board, on the studio table, or actually on the windowsill. In all of these I was interested in a limited palette as well.
Water bottle Oct. 18, 2010, 4x6


Table top Jan 28, 2011, 6x8
Apple & scissors Feb 11 2011 6x8
Breakfast banana March 5 2011 6x8
Oignon June 11 2011 6x8

Magnifier Nov 25 2010 6x8
In the coming few weeks I'll be setting up a separate website specifically to display and auction these small paintings, so check back as your time permits.

Tuesday, February 09, 2016

Garin Baker

Garin Baker, a friend and fellow artist who lives in the Hudson Valley, has a new website. Garin was born and grew up in New York City but has lived on the Hudson about 60 miles north for over two decades. He is a contemporary realist painter whose work includes public art, portraiture, landscapes and other works. He has settled into New Windsor not far from the river in an 18th century Dutch house with a detached carriage house. Over the years and with the help of a gifted French carpenter, Garin has transformed the carriage house into The Carriage House Art Studios, combining gallery space, a gigantic personal studio, and his office.

Since its inception the Carriage House has hosted workshops that have brought participants from all over the United States. Teaching artists at The Carriage House Studios have included not only Garin himself but well-known visiting professionals like Max Ginsburg, an old friend and teacher of Garin's from when he attended art high school in Manhattan.

Besides teaching, Garin keeps up a busy schedule that includes painting giant murals for cities all over--Chicago, Atlanta, Los Angeles, and even Joplin Missouri. His work is widely collected.
"Fire Break" (LA County Fire Dept Mural) in the studio
"Fire Break," Garin Baker, 2012
So take a look at his sites (linked below) for a visual treat.

Garin Baker's Carriage House
Garin Baker's new website

Friday, February 05, 2016

Edouard Cortes, Post-Impressionist

My post about Impressionism not long ago sent me wading into the depths of the Internet, which is usually a good thing. It was definitely a good thing this time since I came across an artist I'd never known about named Edouard Leon Cortes. Although he was well-known in his lifetime Cortes has slipped into near-obscurity since his death in the 1960s. His work is best called post-impressionist, and you can see why when looking at his work. His paintings encompass a wide range of subjects, the most famous being Paris street scenes. He also painted landscapes, still life, figures, interiors, really a bit of everything. Cortes trained with his father and spent six decades painting, most of them in the small town of Lagny not far from Paris where he was born.

Cortes' Paris street scenes are not only specific for the city but also almost always involve rain or snow or twilight, or sometimes all three. There is a deeply romantic, almost sentimental tone to his work, aglow with warm interior light spilling onto shining streets full of bustling pedestrians and overshadowed by a famous landmark or a striking view of a familiar treet. No mistake that Cortes includes such well-known sights of the city as the Arc de Triomphe the Opera, and other well-known sights. Oddly, I've never seen the Eiffel Tower in any of his works. Still, Cortes' paintings may be a bit old-fashioned and a bit sentimental but they're genuine in a way that similar, more recent works aren't. Here I have in mind Thomas Kinkade, for example, whose charming little cottages and cutesy little bridges simply reek of cynicism and kitsch. Unlike Kinkade, Cortes' sentiment seems real, unforced and not cynical at all.

Here are a few of Cortes' Paris scenes.
"Quai de louvre," ca 1925

"Le quai de la tournelle, Notre Dame," ca. 125-30

"Port St. Denis," 1920